I presented the lab we recently did in class at the Chicago Section AAPT Spring meeting. The lab was another one of my "single-sentence labs" which basically came down to:
"Measure the capacitance of a aluminum foil parallel plate capacitor as you vary the separation of the plates by using your textbook."
That may be more detailed than what I actually wrote on the board in class, or it might be less detailed. I don't really remember.
All we did in this lab was make a capacitor by putting sheets of foil inside the physics textbook and measure the capacitance with multimeters that we had in the storeroom. The meters had the ability to measure capacitance. We were measuring capacitance in the nano-Farad range.
I thought the lab was a great learning opportunity for the students and for me, so I wanted to share that with other physics teachers. I got a request for the materials and lab instructions that I used for the lab. Since I do "single-sentence labs" there really isn't a set of lab instructions to share, but I put together my notes from what we did after the first time through the lab.
Here are the slides for my presentation with some extra notes added.
Here are the notes I used in class for discussing aspects of uncertainties in measurement.
Thanks to @DrDawes for the suggestion of the lab! I'd love feedback from anyone who does this lab (or similar) since I plan to do this again in future semesters.
Showing posts with label lab. Show all posts
Showing posts with label lab. Show all posts

July 31, 2013
Toothpick / matchstick lab idea
Since I am going to use the "Measure the value of pi" lab for introducing graphing, equation editors and potentially writing a lab report, I want to have a lab where the goals and the experimental procedure is developed by the students in the class from top to bottom as much as possible. Here's my idea:
I plan to give students a taped box of matches or toothpicks with a random number of matchsticks or toothpicks in them. Alternatively, I could have a single full box that students could have with the ability to put as many or as few matchsticks or toothpicks in as they choose. Hmmm….going to have to think about that one.
There will be only one rule: students cannot open any box until the lab is done and the report is written.
I'm going to ask students: What do you want to know about the box? I want them to write their questions down before they say anything. Then I'll have them discuss in small groups with whiteboards. Then we'll have a short all-class discussion of the questions they are interested in.
I am hoping that the groups will come up with at least "How many matchsticks (or toothpicks) are in my box?" But I would also be thrilled if they came up with questions like "What is the mass of a single matchstick (or toothpick)?" and "What is the mass of the box (and tape)?" These are my goals for the lab, it will be interesting to see what the class comes up with. If needed, we can have a discussion which leads us to these goals.
I will have prepared ahead of time several identical boxes each with a unique number of matchsticks or toothpicks in them and marked on the box itself. I will try to use the same amount of tape on each box, so each box is as identical as possible.
This is the first lab where I will encourage the students determine the process by which they will meet the goals of the lab. I don't know if it's the best way to encourage this process, but it should be a good follow up to the pi lab. I don't think there are many ways to find the mass of a single matchstick or toothpick, the mass of the box and the unknown number in the initial box, other than using a linear fit model, but I'll leave the students to figure that out.
I want to have students make predictions or guesses for the quantities they want to measure before doing the lab. I think it will be interesting to see how these guesses compare to the experimental data. We can have some discussions about orders of magnitude if there are wildly varying guesses.
Then we'll do the lab. I tried this myself and it went really quickly. There's not much to do other than mass the boxes and record the data.

I want to make sure every student has a graph of the data and has used equation editor to express their best fit line equation. If time permits, I want to have them start to write the lab report.
My worry with this lab is again that it is too easy. I hope that by emphasizing the students' control of the goals and procedure it will hold their attention to the end of the lab. Plus, if we finish early, I have an idea for the next lab to do. :-)
April 22, 2008
What does $200 get you these days?
This May our department is offering two sections of the "Sound, Music, and Hearing" class, which fill a general education requirement for Physical Science Labs for non-science majors. It's a fun class to teach because we get to play with a lot of fun toys and do a lot of neat experiments that we don't often have time to cover in the general physics labs.
The professor teaching the other section and I decided that we wanted some new resonance tubes with the water reservoir attached to a stand for looking at standing waves in a closed-open tube. The CENCO (or is it Sargent-Welch?) catalog had the best deals, but they also had the largest variety of resonance tube experiments to order. Our budget is only a few thousand dollars, and as much as we'd like to have 4 resonance tubes for the class, we decided to order one of the low cost models (the Student Resonance Apparatus) and one of the mid-range models (the CENCO Resonance Apparatus). I placed the order a week ago and recently some boxes appeared in the main office.

I opened the box and removed all the packing material. The kit was nicely packaged. All the clamps and the reservoir and rubber tube was all in a ziplock bag. The aluminum rod was taped to the cardboard tube which contained the acrylic tube. I pulled the instructions out of the bag and worked on assembling the apparatus.
Assembly was straightforward. The rod screws into the base, then the clamps are attached and the tube is slid into place. My only complaints were that the rod was not perpendicular to the base (it must have been tapped a little crookedly) and that the instructions kept referring to the "tripod". I don't know about you, but when I see the word "tripod," I instinctively think of something with three legs and not a flat base.

Here's a photo of the assembled resonance apparatus. The tube is quite long, meaning we should be able to get lots of standing waves in the tube for a large variety of tuning forks. I cheated a little bit with the photo by choosing an angle that does not draw attention to the lean of the rod. One of the features that was kind of nice about this apparatus is that the bottom of the tube has a peg which fits into a small hole in the base to keep the tube well positioned. Also, this apparatus includes a clamp for holding a tuning fork above the resonance tube. The clamp is just a right angle clamp, which was a little disappointing that it wasn't anything more specialized, but it will be interesting to see if the clamp works well to hold the tuning fork while the fork is vibrating.
After setting up the mid-range model, I unpacked the economy model. The contents of the shipping box are shown in the following photo.

It may be hard to tell from the photo, but there was an excessive amount of packaging for this kit. All of the pictured components were in a single box stuffed with packing paper. The base and the tube/rod came in separate boxes. And the bag with all of the clamps and reservoir were in a plastic bag, which was so tightly taped shut that I had to destroy the bag just to free its contents. (On Earth Day, of all days...)

After I made it through all of the layers of packaging, assembly of the economy model was as easy as the mid-range model. The tube is held to the rod by a test tube clamp and there is no clamp for the tuning fork.
The economy model uses what is essentially a large plastic cup (complete with the SOLO logo on the bottom) for the water reservoir. One wonders how much abuse the reservoir will be able to stand. I suppose that if it is damaged, replacement would not be too difficult or costly.
The economy model does not have a peg on the bottom to help keep the tube in place on the base. like the mid-range model does.
Also, the economy model is significantly (~50%) shorter.
Here is a photo of the two models side-by-side for comparison:

You can easily see the difference in the height of the two. Also, the lean of the longer tube is more apparent when comparing the two.
The real question is how do the two compare in terms of using them to do experiments. I haven't had a chance to try them out yet, but I have made some observations from putting them together. The real question is: What do you get by spending the extra $200 to go from the economy model to the mid-range model?
From what I have seen you get the following benefits:
The professor teaching the other section and I decided that we wanted some new resonance tubes with the water reservoir attached to a stand for looking at standing waves in a closed-open tube. The CENCO (or is it Sargent-Welch?) catalog had the best deals, but they also had the largest variety of resonance tube experiments to order. Our budget is only a few thousand dollars, and as much as we'd like to have 4 resonance tubes for the class, we decided to order one of the low cost models (the Student Resonance Apparatus) and one of the mid-range models (the CENCO Resonance Apparatus). I placed the order a week ago and recently some boxes appeared in the main office.

I opened the box and removed all the packing material. The kit was nicely packaged. All the clamps and the reservoir and rubber tube was all in a ziplock bag. The aluminum rod was taped to the cardboard tube which contained the acrylic tube. I pulled the instructions out of the bag and worked on assembling the apparatus.
Assembly was straightforward. The rod screws into the base, then the clamps are attached and the tube is slid into place. My only complaints were that the rod was not perpendicular to the base (it must have been tapped a little crookedly) and that the instructions kept referring to the "tripod". I don't know about you, but when I see the word "tripod," I instinctively think of something with three legs and not a flat base.

Here's a photo of the assembled resonance apparatus. The tube is quite long, meaning we should be able to get lots of standing waves in the tube for a large variety of tuning forks. I cheated a little bit with the photo by choosing an angle that does not draw attention to the lean of the rod. One of the features that was kind of nice about this apparatus is that the bottom of the tube has a peg which fits into a small hole in the base to keep the tube well positioned. Also, this apparatus includes a clamp for holding a tuning fork above the resonance tube. The clamp is just a right angle clamp, which was a little disappointing that it wasn't anything more specialized, but it will be interesting to see if the clamp works well to hold the tuning fork while the fork is vibrating.
After setting up the mid-range model, I unpacked the economy model. The contents of the shipping box are shown in the following photo.

It may be hard to tell from the photo, but there was an excessive amount of packaging for this kit. All of the pictured components were in a single box stuffed with packing paper. The base and the tube/rod came in separate boxes. And the bag with all of the clamps and reservoir were in a plastic bag, which was so tightly taped shut that I had to destroy the bag just to free its contents. (On Earth Day, of all days...)

After I made it through all of the layers of packaging, assembly of the economy model was as easy as the mid-range model. The tube is held to the rod by a test tube clamp and there is no clamp for the tuning fork.
The economy model uses what is essentially a large plastic cup (complete with the SOLO logo on the bottom) for the water reservoir. One wonders how much abuse the reservoir will be able to stand. I suppose that if it is damaged, replacement would not be too difficult or costly.
The economy model does not have a peg on the bottom to help keep the tube in place on the base. like the mid-range model does.
Also, the economy model is significantly (~50%) shorter.
Here is a photo of the two models side-by-side for comparison:
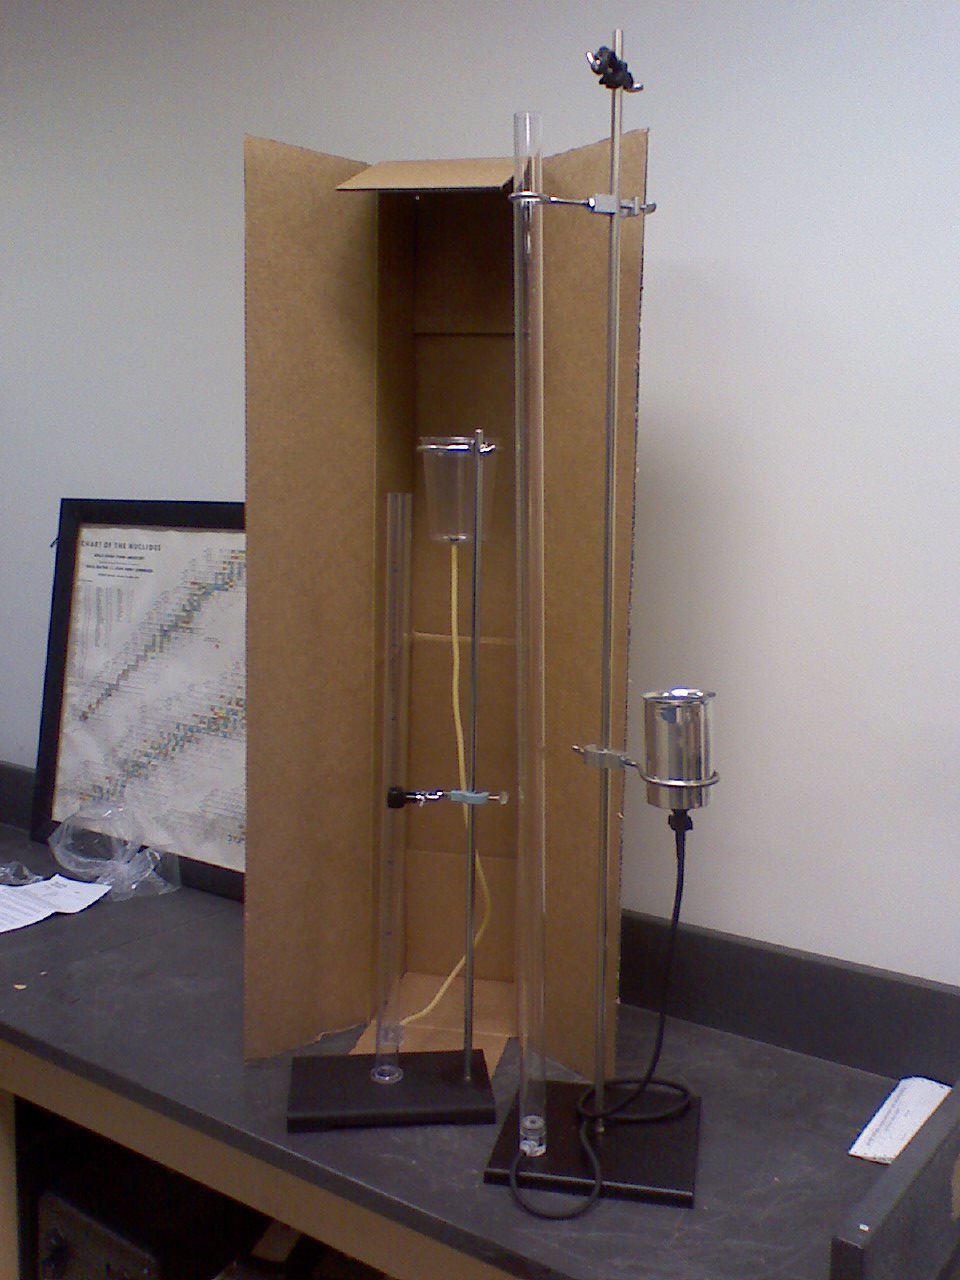
You can easily see the difference in the height of the two. Also, the lean of the longer tube is more apparent when comparing the two.
The real question is how do the two compare in terms of using them to do experiments. I haven't had a chance to try them out yet, but I have made some observations from putting them together. The real question is: What do you get by spending the extra $200 to go from the economy model to the mid-range model?
From what I have seen you get the following benefits:
- Longer tube, meaning a wider range of frequencies to work with.
- Sturdier water reservoir.
- Peg in the base to better hold the tube in the apparatus
- Clamp to hold the tuning fork on the rod
- The machining of the hose connections is clearly of a higher quality. (Need closeup photo to show.)
- Shorter tube means experiments could potentially be done on the lab table, instead of on floor.
- Less expensive components means lower costs for maintenance.
- The smaller size may be easier to store.
Subscribe to:
Posts (Atom)